Ripped vinyl flooring? Patch it up easily! This comprehensive guide will equip you with the necessary knowledge and steps to efficiently repair damaged vinyl floors without breaking the bank. Vinyl flooring is a popular choice for its durability and affordability, but even the toughest materials can suffer damage. This guide addresses the common issue of ripped vinyl and provides a straightforward, step-by-step approach to patching it up yourself. Whether it’s a small tear or a more extensive rip, this guide offers practical solutions and prevents the need for costly replacements. Let’s dive into how to tackle this common problem effectively. This article will cover everything from assessing the damage to selecting the right patch material and tools, making it a comprehensive resource for all your DIY vinyl flooring repair needs.
Assessing the Damage: A Crucial First Step
Identifying the Extent of the Rip
Properly assessing the damage is crucial in selecting the appropriate patching materials and ensuring the longevity of the repair. The severity of the tear will directly influence the methods and tools used. Start by carefully examining the rip. Determine its size, shape, and location. Is it a small, hairline tear, or a significant rip that extends across several planks?
Understanding Different Types of Rips and Their Causes
Ripped vinyl flooring can be caused by a variety of factors including impact, improper installation, or even the gradual wear and tear of normal use. A sharp object or heavy furniture can be the culprit in certain instances. Understanding the cause can prevent future damage and provide guidance for the type of repair. For example, if the rip is along a seam, the method will likely differ than one occurring in the middle of a plank.
Selecting the Right Patching Materials
Choosing the Right Patch Material
Now that you’ve assessed the damage, it’s time to choose the appropriate patching materials. The key is selecting a patch material that matches the color and texture of your existing vinyl flooring to ensure a seamless repair. Consider the type of vinyl used; some vinyl types may require specific patching materials.
Types of Patches and Their Applications
Available patches range from simple adhesive vinyl patches to specialized vinyl flooring repair kits. Each option caters to different damage levels and repair techniques. For small tears, a simple vinyl patch and adhesive could suffice. For larger areas, a more substantial kit with matching materials might be necessary. A quality repair kit often includes everything needed for the task, saving time and effort in gathering the required items.
Preparing the Area for Repair
Cleaning and Preparing the Ripped Area
Thoroughly cleaning the damaged area is essential. Use a clean cloth dampened with a mild cleaner to remove any dirt, debris, or dust from the rip. This ensures proper adhesion of the patching material and the long-term success of the repair. Remove any loose pieces of vinyl to prevent them from interfering with the patching process.
Marking and Measuring for Precision
For accurate patching, carefully measure the damaged area and create a template or guide that perfectly matches the shape and size of the tear. Accurately cutting the patch will ensure a seamless fit.
This precise preparation step is vital in creating a durable and visually appealing repair.
Applying the Patch
Applying the Patch with Precision
Once the damaged area and patch are prepared, carefully apply the patch to the ripped section using the adhesive provided. Ensure the patch is centered and firmly adhered to the vinyl flooring. Press down firmly and evenly to eliminate any air bubbles.
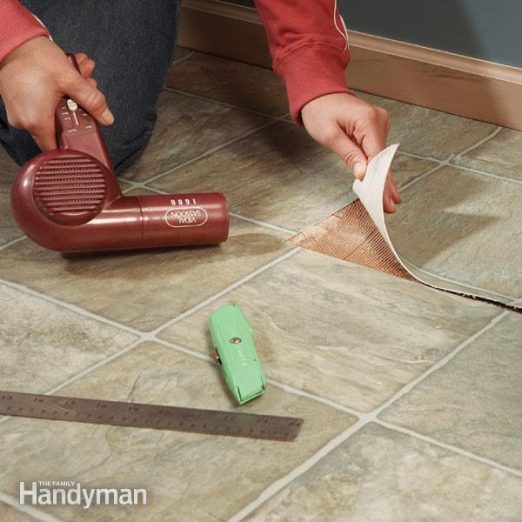
Securing the Patch for Long-Lasting Results
After applying the patch, use a heavy object or a special patching tool for vinyl, depending on the size of the rip, to gently press down on it. This helps eliminate any remaining air pockets and ensures the patch adheres tightly. Allow the adhesive to fully cure as directed by the manufacturer for a long-lasting repair.
Finishing Touches
Smoothing and Finishing the Patch
Once the adhesive is completely dry, inspect the patch for any irregularities or imperfections. Use a damp cloth and mild cleaner to remove any excess adhesive or dust. Use a razor blade for precision in smoothing out the patch, ensuring a completely seamless and aesthetically pleasing finish.
Testing the Strength of the Repair
Lightly test the patch’s strength to ensure its stability and effectiveness over time. This prevents future issues and ensures the repair will last.
Inspect and ensure the patch has bonded properly to the base floor for durability.
Conclusion
A Practical Guide for Success
This guide has provided a comprehensive overview of repairing ripped vinyl flooring, offering a straightforward solution to a common household issue. By following the steps, you can confidently repair minor rips, saving you time and money by avoiding costly replacements. We emphasize that careful preparation and precise execution are essential for a lasting repair.
Additional Tips and Next Steps
Consider investing in a high-quality vinyl flooring repair kit for a seamless repair and increased durability. For large rips, consult a professional floor repair technician. You can also consult online resources and tutorials for further support and ideas.
Start repairing your ripped vinyl floors today!
FAQs
Frequently Asked Questions
FAQ – Ripped Vinyl Flooring Repair
How can I prevent future vinyl flooring damage?
One way to prevent future rips is to be careful with furniture placement and avoid placing heavy items directly on the vinyl. Ensure proper flooring installation to avoid future stress points on the flooring. Protecting the floor during moving or home improvement projects will help keep your flooring safe and undamaged. Regular maintenance can also reduce the risk of tears over time. Use a gentle cleaner and avoid harsh chemicals that could degrade the vinyl over time. Regular maintenance prevents long-term damage, which makes repair easier down the road!
What type of adhesive is best for patching vinyl flooring?
The best adhesive for patching vinyl flooring depends on the type of vinyl you have. Consider consulting with the manufacturer of your vinyl for recommendations. Always follow the manufacturer’s instructions for the correct adhesive and application method to maximize the chances of a successful repair and long-lasting results. Use specialized vinyl flooring adhesives to prevent issues down the line. This ensures strong adhesion and helps the patch remain intact.
What should I do if the ripped vinyl flooring is extensive?
If the damaged area is large or complex, it’s recommended to consult a professional flooring technician. A specialist has the expertise and tools to address more substantial repairs or damages beyond DIY capabilities. They can assess the situation accurately and provide tailored solutions for your needs. They are equipped to handle extensive damage for a successful repair and optimal outcome for your home.
How much will it cost to repair my ripped vinyl flooring?
The cost of repairing ripped vinyl flooring varies considerably based on the extent of damage and the type of materials required. Small repairs using readily available materials can be quite economical, but larger repairs may require specialized tools and materials that increase the overall cost. Doing the research beforehand and comparing options helps one understand potential costs better.
Contact a repair specialist for a quote on extensive damage and consult prices from different contractors for more detailed cost breakdowns. This will allow you to understand the total price associated with the repair.
In conclusion, repairing ripped vinyl flooring is a manageable DIY project. By following these steps and using the right tools, you can successfully patch up your damaged flooring and restore its aesthetic appeal. Remember to prioritize safety, and consult with a professional if the damage is extensive or beyond your skillset. Ready to tackle your ripped vinyl flooring? Visit our website today for more DIY tips and tricks.